
Interior Painting in Redding CT | Drywall Repair & Home Painting Project
Project Type: Residential Interior Painting & Surface Restoration
Location: Redding, Connecticut
Service: Interior Painting, Drywall Prep & Finish Work
Some painting projects are a breeze: just cover the floors, fix a few minor imperfections and crack on with a fresh coat. Easy peasy.
Not this one in Redding, though.
The before photos show a home in the middle of a serious renovation, with exposed drywall, stitched-together seams, half-done window surrounds and surfaces that cried out for more than just a coat of paint. In many rooms, the walls were effectively being rebuilt before any painting could even start.
Which made this project a poignant reminder of something homeowners don’t always see:
The quality of an interior paint job is often decided before you even crack open a paint can.
The Starting Point: A Home Mid-Transplant
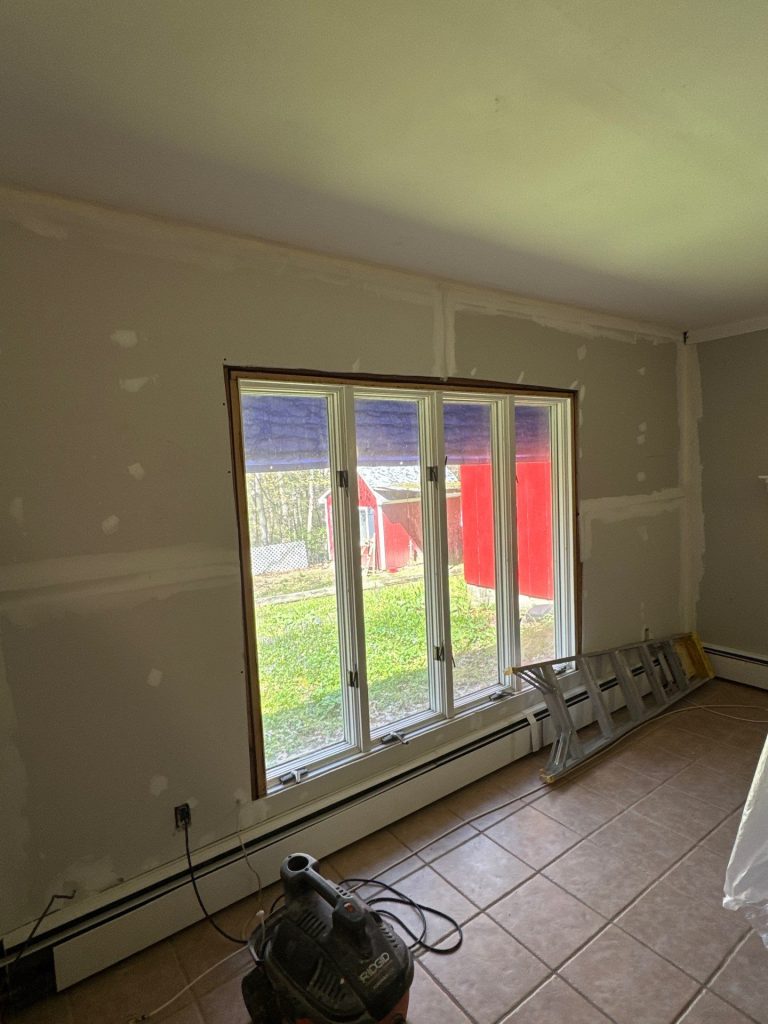


The before pics tell the story in a nutshell.
One room featured a brand new wall of drywall surrounding some big windows. There was joint compound all over the place – seams, corners, patches and transitions – and the new surface had to be finished with care to avoid messing up the existing flooring and heating baseboards.
Another area presented a trickier challenge still.
A small room that was probably part of a bathroom renovation had a mix of green moisture-resistant board and newer drywall, with taped joints, patched fastener spots and unfinished transitions all over the place.
This wasn’t just a case of painting the walls a different colour – they needed to be made into finished walls first.
The Real Challenge: Making New & Repaired Surfaces Disappear
One of the toughest things about renovation painting is getting rid of the visual evidence of the renovation itself.
New drywall has seams that show.
Repairs leave edges.
Joint compound absorbs paint differently to the surrounding surfaces.
Patches become visible as soon as daylight hits the wall.
Paint reflects light, even on low-sheen finishes, and surface imperfections that were barely noticeable during the build suddenly leap out once painting is complete.
The goal, therefore, wasn’t just to cover the drywall with a coat or two.
It was to make all those different materials look like a single, continuous surface.
Careful prep beforehand was essential to getting the finish coats to work properly.
Why Drywall Prep is So Crucial
If you take a close look at the progress pics you can see joint compound running along every single transition.
Horizontal seams got the treatment.
Vertical corners got sorted.
Fastener holes were filled in.
Areas around windows needed extra attention.
Blending new and old wall sections together was a priority.
This bit can look overkill to someone waiting to see some colour on the walls, but without it the finished room can look pieced together rather than properly renovated.
After the compound work had dried, the surfaces had to be refined to get rid of ridges, edges and texture changes that might still be visible under the final coat.
Only then can you primer and paint the wall.
A More Meaningful Transformation
The finished photos show why all that prep work was worth it.
There’s no giveaway that there were repairs made.
No visible join between old and new surfaces.
Instead, the rooms feel proper finished.
The living and dining areas now have a calm, light neutral wall colour plus bright white architectural details. The crown moulding and substantial doorway trim define the space nicely.
The result is understated rather than showy – which is precisely what makes it so effective.
You notice the room, not the repairs.
Letting the Architecture Do Its Job
One of the standout features in the finished space is the ceiling.
There’s a big recessed or tray-style ceiling with detailed moulding around it. Rather than covering all those architectural details in flat paint, the finished colour scheme uses contrast to great effect.
The lighter walls and trim help define the space, while the deeper tone in the raised ceiling area adds some much-needed depth.
It gives the big, open-plan room a more considered sense of proportion without overpowering the furniture or the dining area.
That’s a great lesson when painting rooms with architectural features:
Not every surface needs to fight for attention.
Sometimes the best colour plan is one that quietly separates walls, trim and architectural features so each can be appreciated on its own.
The Fireplace Area: Allowing a Focal Point to Take Centre Stage

The fireplace wall is another good example.
Rather than turning the surrounding walls into the main event, the subdued paint colour lets the darker stone fireplace take the starring role naturally.
Bright white trim and the substantial mantel create a crisp boundary around it.
That works because the painting doesn’t try to compete with the existing materials.
The stone brings texture.
The flooring brings warmth.
The walls provide a neutral background.
The trim sharpens everything up.
Good interior painting isn’t always about adding more colour. Sometimes it’s about keeping things quiet enough for the permanent features of the home to stand out.
Turning Connected Rooms into One Whole Interior

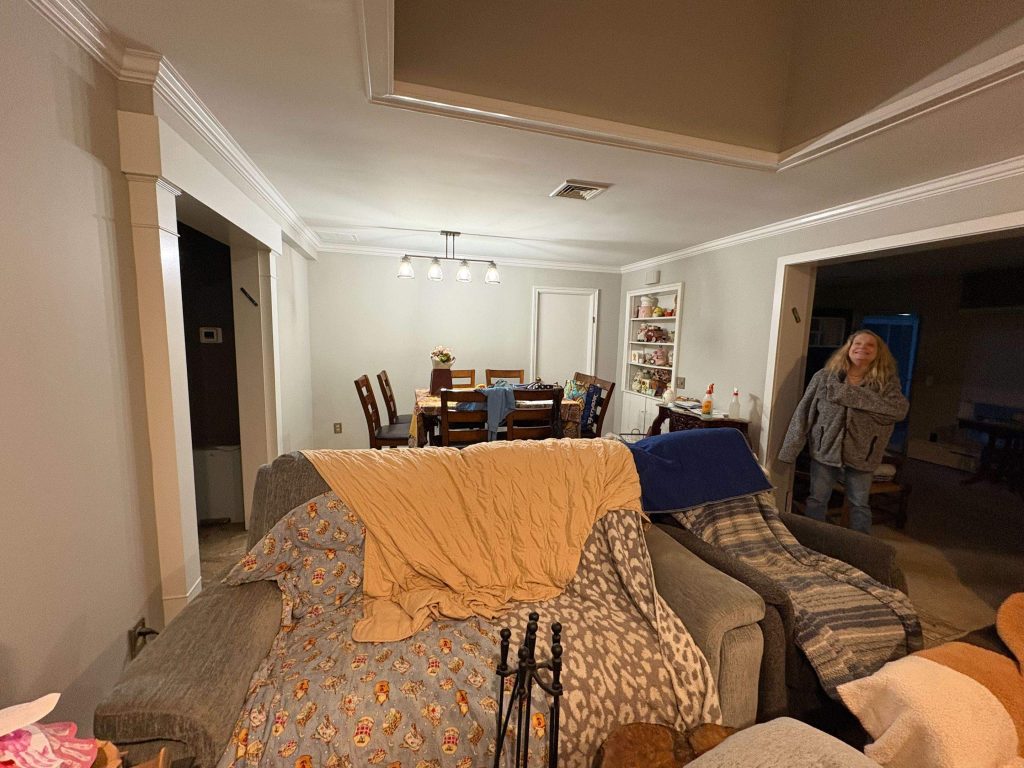
The finished photos also show an open living and dining area.**Painting Challenge – Making a Home Feel Whole
Sometimes when you can see multiple spaces at the same time, trying to treat every room like a separate bubble can give your home a disjointed feel. It’s like trying to get everyone in the household to separate their own personal style. In reality, colours and trim finishes have to work in harmony as you flow visually from one room into another.
Here’s a great example of how a consistent wall finish and bright trim can create a nice flow through the space even when there are doors opening up between different rooms.
Door openings seem to have been placed on purpose.
The crown molding does a great job of carrying the eye around the room.
The dining area has enough of its own identity to stand out, yet still feels like it belongs to the same space.
But continuity is especially important in open-plan homes where you rarely get to experience each room in isolation.
The Result – Your Home no Longer Looks Renovated
One of the biggest compliments a renovation paint job can get is that the finished space just looks… done.
No one can even tell that there used to be a big mess there – that it was under construction at one point.
That happened here.
The repaired drywall is no longer the centre of attention.
You can’t even see the seams.
You can’t even see the patches.
It’s just a clean, comfortable space with crisp lines, soft neutral walls, restored surfaces and a much better flow between the living and dining areas.
That transition – from looking like a construction site to looking like a finished home – is what professional interior prep and painting should aim for.
The Teaching Moment – Don’t Count on Primer to Save the Day
This Redding project is a great example of a common misconception.
Some homeowners think that if they slap on some primer, pretty much anything can be hidden.
But primer can’t.
Primer helps make sure the paint goes on smoothly and evenly, it can help the paint stick properly and even out the finish. But it’s no miracle worker – it can’t just make poor quality drywall or uneven repairs disappear.
It all has to be done in the right order: repair, finish, sand, inspect, prime, inspect again, paint. If you can see an imperfection before you paint, it’s probably still going to be there afterward – and sometimes even more noticeable.
That’s why pros spend so much time on surfaces that are going to be hidden in the end.
Painting After Renovation is a Whole Different Animal
Painting a just-finished bedroom is a very different job from painting after drywall replacement or a big remodel.
Renovation projects bring up all sorts of different surface conditions right in the same room.
New drywall
Existing walls with old paint on them
Joint compound where there used to be a hole in the wall
Patched areas that are all raised up
Fresh trim and older trim that look like they belong in different decades
Every one of those surfaces can react differently to primer and paint.
The painter’s job is to create enough consistency underneath that you never notice those differences when you look at the finished walls.
This Redding project is a fantastic example of that.
A Finished Space Shouldn’t be a Big Ad for the Renovation Work
There had been a lot of prep work that went into these finished rooms.
If you look through the before-and-after photos you can probably guess that.
But what you see when you walk into the house is just a calm, finished space.
That’s the idea.
All the hard work went into making it look that easy.
The new finishes are the perfect background for the real showstopper elements – the hardwood floors, big windows, architectural details, fireplace and furniture.
Sometimes the most impressive renovation is the one where all the tough work just disappears.
Getting Your Redding Home Ready for a Paint Job
If your Redding home is getting drywall repairs, a remodel or an interior overhaul, painting should be thought of as part of the finishing process – not a last-minute way to cover up all the mess.
At CET Painting, we focus on getting the surface right first so that the finished paint job looks smooth, even and intentional throughout the whole room.
Whether it’s repairing drywall, renovating rooms or just giving your interior a professional refresh, careful prep is what makes the final result look like it was always meant to be that way.