
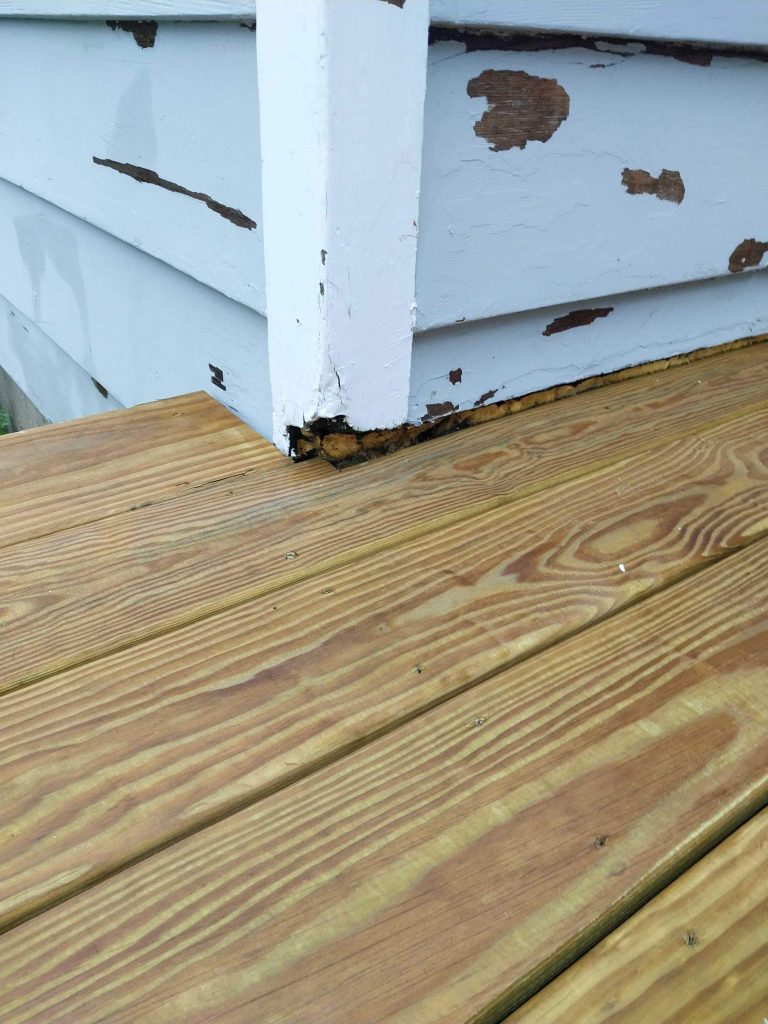
What Peeling Exterior Paint Says About Your Putnam County Home
By now in August, Putnam County’s weather has already started putting a lot of pressure on your home’s exterior – humid conditions, sudden showers, thunderstorms, followed by more heat and rain chances; it’s a tough combo. All of which can quickly make any existing exterior paint problems visible.
Maybe a patch of peeling paint looks like a minor cosmetic issue. But actually, it’s telling you something. What’s hiding under that peeling paint? Is it water seeping through to the material beneath the paint? Or maybe the old paint has lost its grip, the caulk has given up, or the bare wood isn’t getting the protection it needs from the weather.
Before you start slapping on a new coat of paint, you need to figure out what this peeling is trying to tell you.
Peeling Paint Really is Just a Symptom
Exterior paint is meant to act as a protective film over your siding, trim, doors, railings and other surfaces. But when that film starts to fall off, something has gone wrong with its ability to stay attached.
A lot of the time, it comes down to water. When water seeps into a painted wood surface, the material starts to swell up, and that puts pressure on the paint film. No surprise then, that the paint starts to loosen, crack, blister or fall away. That water can get in through a variety of routes – like a gutter that’s not doing its job, a roof problem, or some other weak point in the system.
And it’s not just water. Peeling can also result from painting over a surface that’s still damp, dirty or if it’s a glossy or poorly prepared surface to start with. Putting paint on a surface like that might make it look a bit better for a while, but it’s not a long term solution to the problem.
So the first question shouldn’t be “what colour shall we use?” – the first question should be “what went wrong with the last lot of paint?”
Why Exterior Problems Show Up More Often in August
Summer weather puts your exterior surfaces through a really tough test – all day the sun beats down on them, and then the thunderstorms come along with some more moisture. Then it’s another round of heat and drying out. All of which can start to put pressure on weakened coatings and older paint that’s no longer doing its job.
It also means that paint takes a bit longer to dry out as the humidity rises, which can make a difference in how you plan on repainting – and how long to wait before exposing the new coat to rain or heavy moisture.
For Putnam County homeowners, August is actually a pretty useful time to take a good hard look at the exterior of your house. Just be aware that the weather is still a bit unpredictable, so don’t assume you can go ahead and start painting right away. You need to take a closer look at what’s going on with the surface, and wait for a bit longer till the weather is more stable.
Six Areas to Inspect After a Summer Rain
1. The Lower Siding and Trim
Start by taking a close look at the bottom of your house, where the siding and trim are closest to the ground. These areas get pretty wet from rain splash, damp soil, and all the vegetation right next to the house.
Keep an eye out for peeling paint at the bottom of your boards, dark patches of staining, and any gaps that have opened up in the joints. Also look for any areas that are lingering dampness for longer than the rest of the surface. If you see peeling down there, it might suggest that the paint is getting a soaking every time it rains rather than just running out of lifespan.
2. Window and Door Trim
Windows and exterior doors have a lot of joints where water can get in. Check the corners of the frames, the sills, thresholds, and all the areas where the trim meets the siding. If the caulk is cracked or missing, water can get behind the paint and start causing problems.
Take a look out for any windows that are getting hit by wind driven rain, and the trim that’s right beneath your gutters or roof edges.
3. Deck Boards, Steps and Railings
Decks are a bit of a different story. They get direct sunlight, standing water, foot traffic, and all sorts of movement from furniture and people walking around. Plus, they’re right at the mercy of the seasonal temperature swings.
Check for worn coating on walking paths, peeling around any screws or nails holding the deck boards together, bare wood at the ends of the boards, and any deterioration where the posts meet the deck.
Some areas might just need a quick bit of touching up, but if the coating loss is widespread, it might be time to think about restoring the whole deck rather than just patching up a few bits.
4. Porch Columns and Exterior Woodwork
Columns and posts and fascia boards and decorative trim – these are the sorts of features that often have joints and end grain exposed to the weather – and that can be a real nightmare to deal with.
Take a good hard look at the bases of any posts and columns. Check for any sign of softness, or crumbling – or just plain visible damage to the wood. If you see peeling paint accompanied by any of these signs, it’s not just a paint problem – the wood itself is probably going to need some work before you even think about painting.
5. Gutters, Downspouts, and Roof Edges – The Root of The Problem
And then there’s gutters, downspouts, and roof edges. Sometimes paint failure can be a sign of a problem elsewhere in the system. If your gutters are clogged or your downspouts are leaking, or if your roof edge is in a bit of disrepair – that can lead to water getting onto your siding and trim. Which is exactly why Sherwin-Williams says you need to get to the bottom of gutter, roof, ventilation, and caulking problems before tackling exterior peeling issues caused by moisture. Because repainting without tackling the root cause just means the same issues are likely to come right back – and you’ll be back to square one.
After a big rain, take a walk around the property and see if you can spot where water tends to collect, overflow or run down the building. That way you can get an idea of where the problem areas are likely to be.
6. Sides of the House that are in the Shade – A different ball game
The side of your house that’s stuck in the shade may still be damp after rain for a while longer. Trees, bushes, tight spaces between buildings and not much air movement can all contribute to a real slow drying process.
Take a close look at these areas for peeling paint, mildewy patches of colour, failed caulk, and any paint that feels soft or unstable. And if there’s vegetation touching the house, it’s worth checking out too because it can trap moisture and make it a real challenge to get to some areas – or even just inspect them properly.
When Just Painting Won’t Cut It – A bit of a fixer upper
Some exterior surfaces need more than just scraping and a new topcoat. They need a bit of TLC to get them back on track.
You might need to call in the professionals to assess the situation when the wood is soft, flakes apart when you touch it, has open cavities or is just generally falling to bits around things like post bases, windows, doors or rooflines. Active leaks, drainage problems and areas that stay wet all the time just don’t lend themselves to a quick paint job.
The same goes for widespread paint failure. If several layers of paint are peeling off together, the contractor is going to need to check how well the remaining paint is still stuck on before deciding how much needs to come off.
Painting over an unstable surface is just hiding the problem – it’s not a solution.
What Proper Preparation Should Involve – Laying the groundwork
A good exterior finish is all about the work that gets done before you even pick up a brush.
First things first, the surface needs to be dry, clean and structurally sound before you even think about painting. That means getting rid of any loose or peeling paint, dirt, mildew, chalky residue, failed caulk and all the other mess that’s holding you back.
Depending on the surface, that might mean:
- Scraping off loose and failing paint.
- Sanding down rough edges to get them nice and smooth.
- Cleaning off dirt, grime and all the other gross stuff that’s built up.
- Replacing failed or old caulk.
- Fixing or replacing damaged wood.
- Priming any exposed wood and repaired bits.
- Protecting things like windows, fixtures, plants, masonry and nearby surfaces.
- Making sure the surface is dry before you apply the first coat.
You want to prime particularly where you’ve got bare wood, repairs, stains or unstable old paint. Exterior-grade primers do a great job of creating a solid foundation and improving adhesion between the surface and the finish coat.
Why the Weather Window Matters – Timing is everything
Just because the sun is out doesn’t mean it’s a good day for painting. The contractor needs to take into account the surface temperature, air temperature, humidity, sunlight, wind, rain and what the paint manufacturer says the paint needs in terms of temperature and drying time. They’ll give you some guidelines on what works and what doesn’t for their particular product.
High humidity can slow things right down, while wet weather can expose the paint before it’s even had a chance to dry properly. Benjamin Moore advises avoiding wet or damp conditions and letting the paint dry for the right amount of time.
This is especially true if there’s a storm forecast for the week ahead. You might need to break the job up into sections or put it off till the weather clears up.
There’s no one-size-fits-all rule that says every exterior needs to be painted a fixed number of hours after rain.
Wood moisture, how much sunlight the surface gets, temperature, airflow, the type of surface and product instructions all play a part.
Fix First, Then Protect – Getting it rightThe most effective exterior painting jobs are pretty straightforward. They follow a simple order:
Identify the problem. Fix the problem. Prep the surface. Put on the right paint.
Skip the first two steps and you could end up with a finish that looks great at first but then starts peeling off like crazy the next time it gets a good soaking or a blast of heat.
For instance – replacing failed caulk won’t solve anything if the overflowing gutter is still letting in water, and painting over a rotten column isn’t going to do the trick if the wood underneath is still rotten. Applying the best paint in the world over loose layers isn’t going to create a solid foundation.
The paint is just the icing on the cake – the final protective layer. It’s not a magic fix that makes up for the repairs you need to do first.
A Practical August Walk-Through for Putnam County Homeowners
Take a dry day and go for a walk around the property. Take a step back and have a good look from a distance, then get up close to check out the vulnerable areas more carefully.
Grab your phone and shoot some pictures of anything that looks out of place – peeling, cracking, bubbling, open joints, dark wood, exposed board ends and soft areas are all worth documenting.
Then take another look after it’s rained a bit – that can give you a better idea of where water is flowing, which areas are staying wet and if your gutters and downspouts are directing water the right way.
Don’t go tearing off peeling paint or disturbing old coats unless you really need to – homes with older paint layers might need some special safety precautions or even a pro to come and take a look before you can even think about scraping or sanding.
What Should a Proper Exterior Assessment Actually Include
A good painting estimate should tell you more than just how many gallons of paint you’ll need.
The contractor should be able to give you a rundown of what surfaces are failing, what prep work is recommended, whether any of the wood needs repairing, where they’ll use primer, what needs caulking and how they’ll protect the surrounding areas.
The proposal should also make it crystal clear whether they’re talking about cosmetic touch-ups and more fundamental coating failures – the difference between the two is going to have a huge impact on the prep work, project scope, how long the job will last and of course the cost.
Homeowners need to get a clear picture of what is being fixed and prepared before they give the project the thumbs up – not have those details come to light after the painting has already started.
Protect Your Home Before Winter Hits
August gives you a head start on fixing exposed exterior surfaces before the weather gets cooler and wetter.
Bare wood just keeps sucking in moisture if it’s not protected – and even failed caulk can let water in. Small areas of decay might not seem like a big deal at first, but repeated rain, freezing temps and seasonal movements can turn them into a whole lot worse.
The key is catching the problem early – that way you can nip it in the bud before it turns into a full-on restoration nightmare and you end up with a full-blown restoration project on your hands.
But the goal here isn’t just to slap some fresh paint on the house and call it a day – it’s to get the exterior surface properly prepared and weather-resistant so it can